My name is Olamide Ajisafe. My candidate number is 8010. I am in a group 3 with Jerom Thambipilliai (8692) and Matthew Davies (8511). To see my work, please click on the 3 labels on the right named A2 Research and Planning, A2 Construction, and A2 Evaluation.
Below is our finished music video...
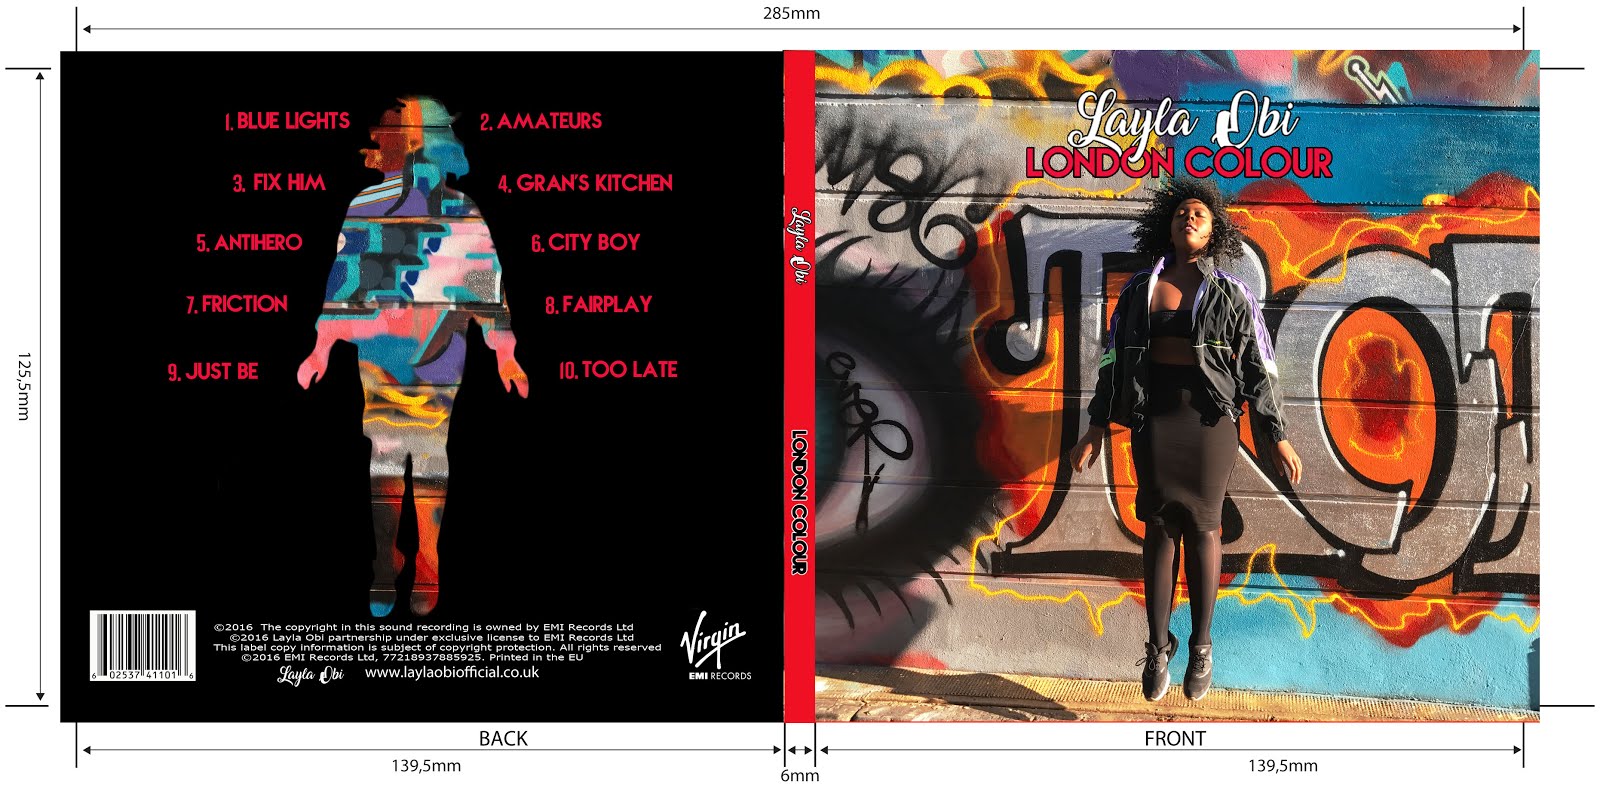
Below are the external panels of our Digipak. Left is the back and right is the cover
Below are the external panels of my Digipak
Left is the back of the album and to the right is the front
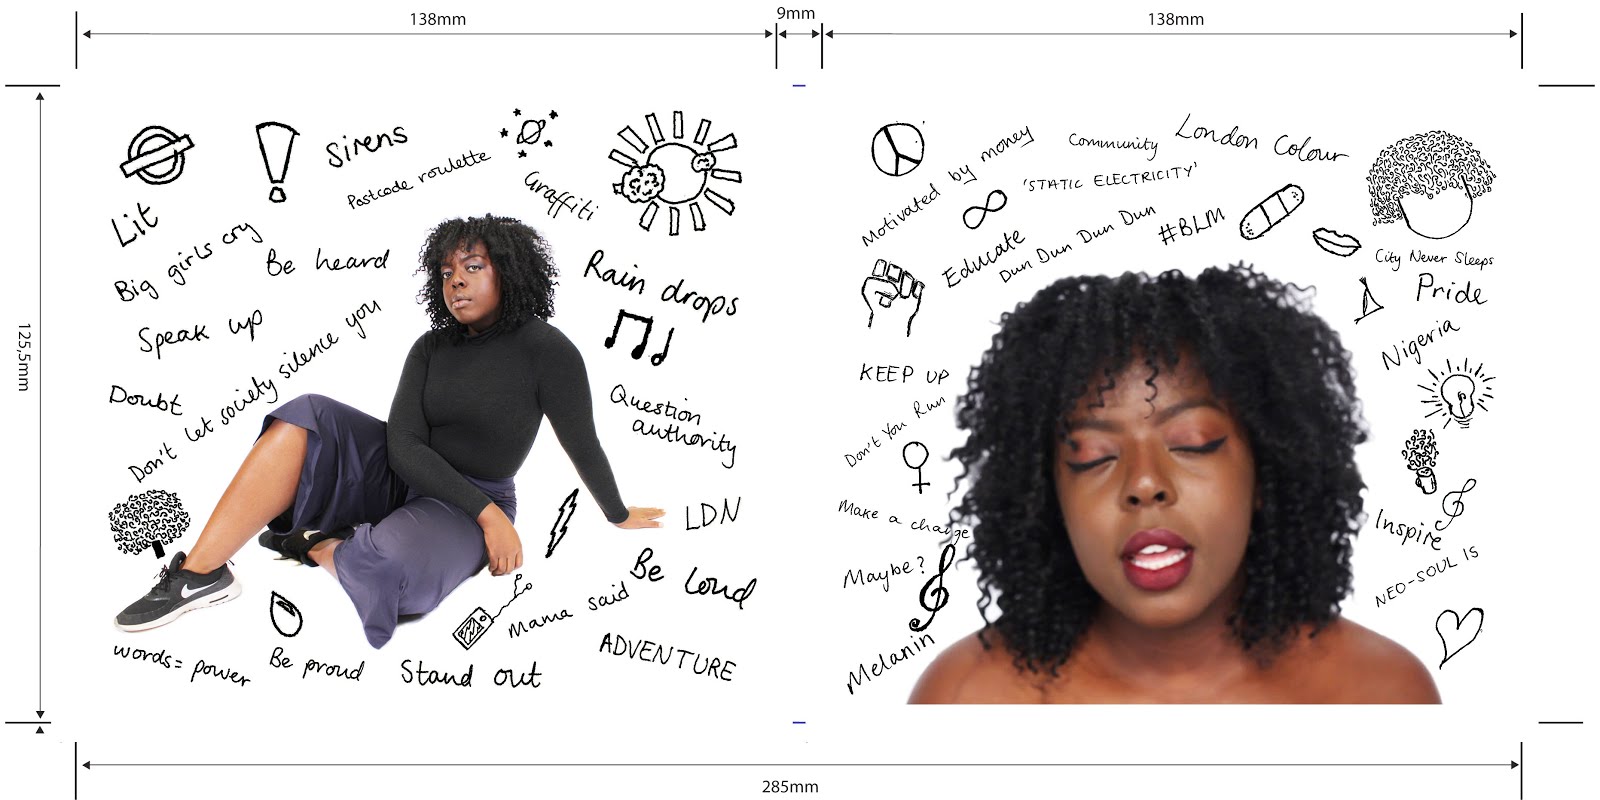
Below are the internal panels of our Digipak
Below are the internal panels of our Digipak
Below are the internal panels of our Digipak
Click on the image below to be directed to our website
I had an amazing time during the main workshop and it allowed me to have so many new and exciting experiences. This process has allowed me to learn new skills and has enabled me to enhance my performing skills through working with industry professionals.
The video above is a time lapse of our production studio. From this we can see the many different set ups created throughout the day, including different uses of lighting and costume.
Throughout the day I took on many roles, ranging from acting on screen as Taylor Swift to acting as clapper loader:
A picture of me acting as 'Hip Hop Taylor'
This project has really helped me to develop my performance skills, and has helped me cater these skills to working in front of a camera which is something that I had not done before. At first, it was very daunting having to directly address the camera, however, through rehearsal I became more and more comfortable with this and eventually began to enjoy it.
A picture of me slating the shot
Being behind the scenes was an invaluable experience for me as I was able to experience what life on a set may be like first hand. Throughout the day I learnt various new techniques and terminology such as 'slatting' the clapperboard from our director, Dom. I was able engage with the crew on set and made good conversation whilst doing so.
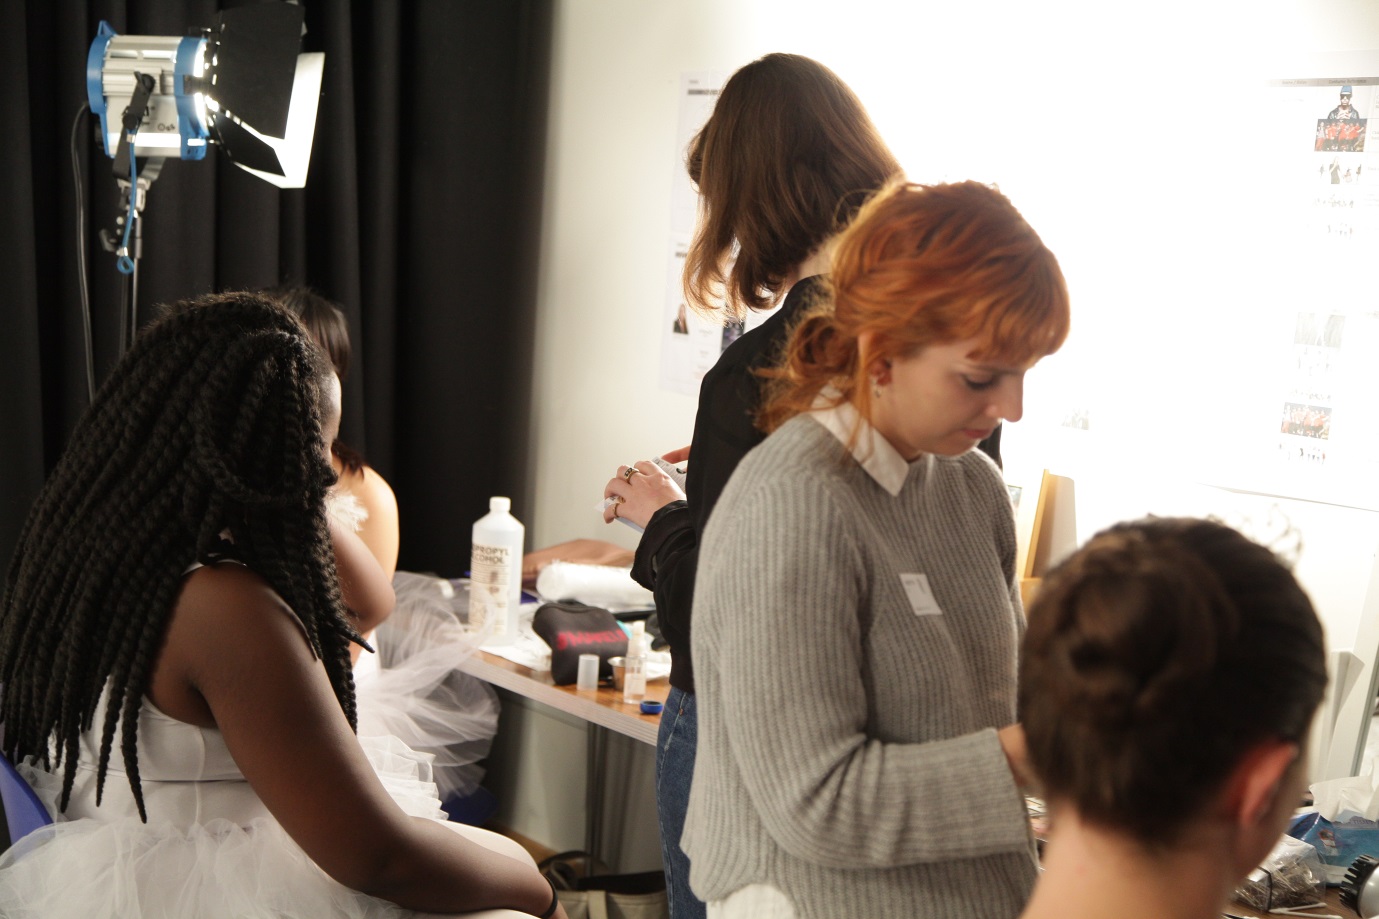
Me getting my hair and make-up done
In the beginning, it felt very weird having my hair and make up attended to by professionals, however as the day went on we were able to become more comfortable around each other as they were extremely nice and comforting which was much needed on such an intense day.
Between takes
Overall, my favourite parts of the day were when I was performing with all of my peers as I was able to see all of our hard work finally come together. The atmosphere of the studio was an extremely fun and calm one and it was honestly a day that I don't think I will forget anytime soon.
This task of creating an audition video was very useful as it helped me become more familiar with the camera. Through this process I was able to become more aware of which parts of the camera I was looking at and attempted to avoid looking at the view finder of the camera rather than the lens of the camera. This meant that I directly addressed the audience and made for a more involving video. Unfortunately, I had to film this video alone as my partner was unavailable for filming. This caused me some issues as I had to set up the camera myself, whilst still attempting to keep within frame. This resulted in a lot of running backwards and forwards between my placement and the camera. Although this was tiring, it helped me to appreciate the large amount of effort that goes into the making of a music video. If I were to do this task again, I would record more takes of myself lip-syncing as I feel that it is not completely accurate at some points. Below I have included my audition video.
Prelim Task 2
Due to Taylor embodying several different genres within the music video, we had to learn varying types of dance styles. Our routines consisted of ballet, hip hop and contemporary moves, which each required a different skill set. Our dance teacher, Natasha, guided us during our rehearsals and ensured that we were constantly aware of what we were doing. We concentrated on exaggerating our precise physical movements and facial expressions in order to effectively our emotions to an audience, whether it was in real life, or on screen. This was also developed with the help of our drama coach, Jasmine, who helped us learn how to effectively embody the character of Taylor Swift. The varying dance routines made it harder to learn the movements as it could often get confusing, however, with many hours of rehearsals and the help of Natasha's online tutorials, we were able to learn all of the routines in such a short space of time. One thing that I did learn through this process was the need to actually sing the words of the song whilst performing in order to achieve the strains in your neck muscles so that the words looked as though they were actually being spoken.
Natasha's routine tutorial
Natasha's routine in the final edit
Prelim Task 3
In preparation for the shoot day, we had to decide on the costumes that we would wear for each set up. With the aid of our teachers and our costume designer, Olivia, we were able to find outfits that we felt stayed closest to the Taylor's costume in the actual music video and we were constantly adding to them in order to achieve this. For example, in the picture below I am holding a black bomber jacket however, in the final edit we decided to go with a red hoody instead. Although this was not the exact jacket that we wanted, it was the closest fit to the jacket that Taylor wears that we could find.
Original hip hop costume
My final hip hop costume
Above I have included photographs of myself with all of my costumes.
Prelim Task 5 This was the editing portion of the project and involved us creating our own sequences of the remake in groups. In my group I worked with Pheobe and Jerom. Editing a remake was a new experience for me and brought on some new challenges. For example, it was imperative that we matched the movement of lips to the lyrics of the song so that it appeared that the words were being spoken. This meant that we had to make very precise cuts during our edit. This was made easier by tools such as the razor tool as it allowed us to cut out the unnecessary parts of a take quicker. Originally, I was in charge of editing the street, contemporary and ribbon sections of the music video, however, eventually we decided as a group to simply edit whichever section we had the shots for. Personally, I found grading the most difficult part of this process as there had to be many different options to suit the different set up and lighting choices. Below I have included a picture showing some of my group's footage before and after grading.
Before
After
This helped me to learn the importance of grading as I was able to see an incredible improvement concerning the aesthetics of the footage afterwards. It helped to make all of the colours really pop and connoted energy and youth, which is vital in a pop video.
Overall, I am extremely pleased with my groups final edit and the quality of the footage that we created. I have had nothing but positive feedback, with people saying comments such as "It's so good, I loved it!" and "It's great, it looks so professional".
I think that our edit was very successful as it looks extremely similar to the original music video, which was the aim of our brief. Some of the areas that I am particularly please with the outcome include:
The overall grading, especially in the ballet sequence
The precise shot changes and cuts
The overall performance of everyone who took part
The accurate lip syncing
We were able to use our grading to improve the aesthetics of our footage, whilst also making it appear more similar to the original music video.
We graded the footage above with the goal of creating a cold look to it in order to fit the slight blue/grey tint of the original shot, which may be seen in the bottom right corner.
A picture of our three way colour corrector
We were able to achieve this look by playing around with the settings of our colour corrector. By adding blue shadows we were able to achieve this cold look.
Even though our edit was very successful overall, due to restrictions of space and availability, we were not always able to exactly replicate the original music video. For example, we were unable to remake the very intricate dance moves such as back flips, so had to substitute for shots of less difficult moves (as seen below).
Doing this prelim has made me aware of many aspects of music video production that I may not have been aware of before. For example, doing this project has made me confident enough to consider performing myself in my own music video. It has also made me more comfortable and confident around the equipment in the studio such as the cyclorama and the sound desk. I have also developed my styling abilities through this project by helping to create my own costume. This made me realise how much of a bearing costume can have on the overall look of a music video and has made me want to chose a style for my own music video which is bold, yet does not distract from the performance of my actors. This project has also helped me see the music video conventions that I have learned in action. For example, I learnt that beauty shots are an essential part of any music video as they showcase the main character within the video; allow the audience to get a closer of their make up/costume and also break the fourth wall of the video, making it more personalised for the watcher. Below I have listed some of the essential things that I have learnt from this prelim:
Pre-production
Have a clear idea of what type of music video you wish to make. This includes genre which will affect all decisions made for my music video such as setting, styling and artistic choices.
Decide which characters will be in your music video and how you will characterise /style them in order to suit your chosen genre.
Arrange rehearsals for your actors so that they have an opportunity to grasp what will be required of them on the day.
Have lists detailing everything that will be required for any of the actors i.e costume lists and make up lists.
Have a very detailed call list/ shoot schedule so that all parties know where they have to be and when. This should also include the numbers of all crew members in case of an emergency.
A picture of our call sheet
Production
Aim to start production early in the morning to prevent having to rush the shooting process.
Use a variety of shots in order to create a more interesting looking music video, whilst also keeping to their conventions. For example, use some close up beauty shots of the actors within the music video in order to showcase the actor and their make up/ costume, whilst also providing shot length variety.
Use a variety of lighting settings to take advantage of the many capabilities of the sound desk.
Ensure that your actors actually sing along to the song when shooting in order to stimulate the movement of neck muscles for a more authentic look.
Make sure that you encourage and praise your actors as it can often be a daunting an tiring experience.
An overview of our production space
Post-production
Create an editing scheduel for all members of your group.
Edit in a non-linear fashion in order to adhere to music video conventions
Grade your footage according to the music genre of your choice so that it may be easily identifiable.
Sequence shots in a rapid, montage style in order to prevent audience members from being able to concentrate on one element of the footage for too long. This variety creates a more interesting look and sticks to music video conventions.
No need to edit shots in a continuous fashion. In fact, it is better if it is not done this way as the cuts appear more dramatic.
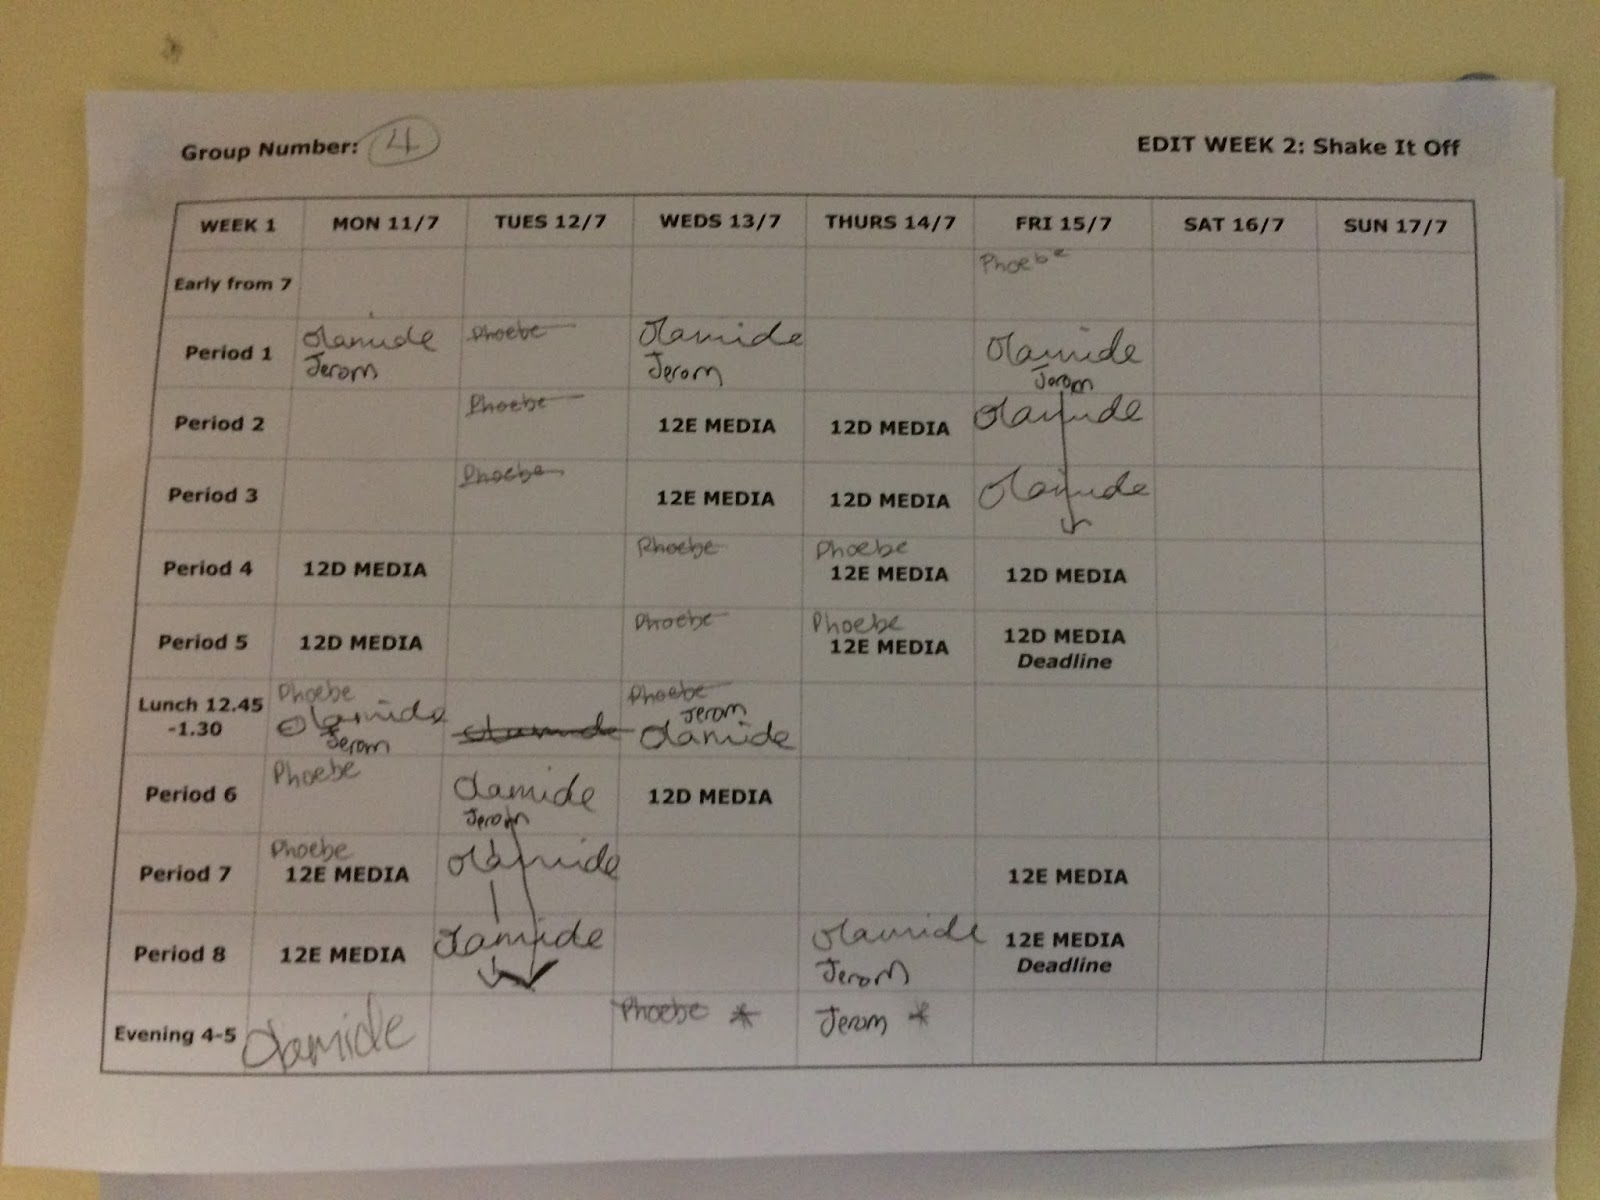
A picture of my groups edit week 2 schedule
Overall, completing this prelim has been an invaluable experience and has made me even more excited to create my own content in the future.